· By Steffen Smith
How to Set Tracking Force On Your Turntable
Stylus pressure, or tracking force as it is sometimes called, is simply the weight, or force, placed on your stylus as it rides down in the grooves of your vinyl record. It’s a super critical adjustment and is usually made when you are first setting up your turntable.
A weighted knob on the back of the tone arm is used to set the tracking force, which is measured in grams. Tracking force is typically fairly light — typically from 1.5 to 2.5 grams, although it can be as low as one gram and as high as three. Again, a super critical adjustment. Not enough tracking force and your style won’t get down into the groove properly.
Remember, there are bumps and ridges on the walls of the V-shaped groove, all the way to the bottom. The better the needle fits down into that groove, the more audio data it captures. Think of your finger tracing over a brail alphabet. If your finger just brushed slightly over the raised letters, you'd maybe miss some letters and get an incomplete picture of the words. Press down a bit harder, and you start feeling all of the letters and words. That’s stylus pressure in action.

In the worst case, not having enough tracking force will cause the needle to hop out of the groove and skate over the surface to the center of the record, giving you a god-awful screech and potentially scratching your vinyl.
The problems are a little more serious if the weight is too heavy. Smashing that needle down into the groove with too much force can cause distortion, a reduction in detail, and overpowering bass. The excessive weight can also cause damage to the vinyl. I went way too heavy with stylus pressure one time, and could actually see vinyl shavings coming out of the grooves while I was trying to rock out to Back in Black.

So, how do I determine the right stylus pressure for my turntable? Well, if you have a low to mid-range turntable — not necessarily a cheap one, just not a higher-end table — stylus pressure is not adjustable. There’s no knob to turn. The pressure is already set at the factory, and it tends to be a bit on the heavy side – 2.5 grams or so. Not a bad thing. Just the way it’s set up.
As you move up the ladder to a better turntable, you’ll be able to adjust the stylus pressure yourself. Here, it’s important to understand that stylus pressure is determined based on your specific audio cartridge and stylus. The owner’s manual that come with your player will have that number in grams, along with instructions on how to set it properly.

If you switch out your stylus or cartridge, you’ll need to set tracking force to the manufacturer’s specs. They’ll typically be included with the stylus/cartridge.
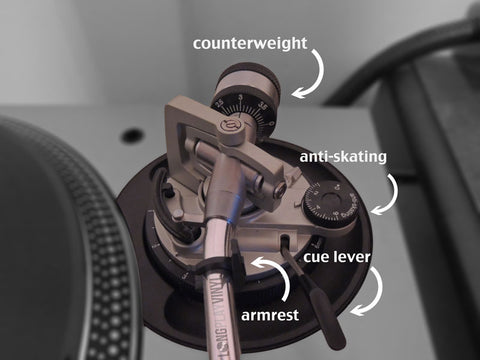
Once you know the correct setting, there are a couple of ways to dial in the stylus pressure.The first is called zeroing out. That is typically the method that will be explained in the owner’s manual and if you’re watching a Youtube video. As you assemble your turntable, you screw on the counterweight (if it’s not already on there). Then you take the tone arm and try to get it perfectly horizontal, with the needle just floating slightly above the record. BTW: Be sure and remove any kind of stylus protector that the turntable might have been shipped with.
To get it zeroed out, you turn the counterweight clockwise to increase the weight, or twist it counterclockwise to decrease the weight. Once you’ve got it hanging there neutral, you call that zero. You set the ring with the gradations on it to zero. Now, grasping both that ring and the counterweight, you turn it the proper weight. You’ve got to turn both of those things at the same time to be able to tell where you’re at. That’s the zeroing out method, and most people can do a pretty reasonable job with it.
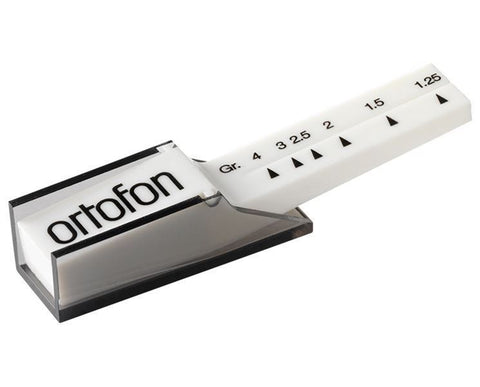
The method I prefer, because it is much more accurate, is to use a scale or gauge to dial in that tracking force. There are little see-saw like gauges that work for that purpose. You just set it up to the desired weight, and place the needle on it. If it goes down too far, back off on your counterweight. Not enough, screw the counterweight down a bit. This is an old-school method that audiophiles have been using forever.
![]()
My personal preference is to use a small digital scale made for this purpose. You can get one for around $25, and the good ones come with reference weights that you can use to verify the scale is functioning properly. You just set the scale on the platter and lower the needle onto the center spot. Then, adjust the tracking force accordingly.

While you're at it, go ahead and set the anti-skate force, if your turntable allows. Anti-skate is the force pushing back laterally on your stylus to counteract the tendency of the tone arm to move inward (skate) toward the center of the record. Traditionally, anti-skate is set to the same amount as the tracking force.
Once you have your tracking force set, you should give it a check at least once a year. And definitely re-check if you accidentally knock your tonearm out of place, or move your turntable to a different location. Just remember, the more complete contact the stylus is making within those grooves, the more complete the sound being reproduced.
And as always, remember to keep those records clean. Any dust, grunge or Cheeto crumbs in there are going to cause pops and crackles and hiss that no amount of tracking force can overcome.
We’ve got a full line of record cleaning accessories at www.deafmanvinyl.com — including carbon fiber brushes and Discwasher cleaning kits.
Until next time, keep 'em spinning!